
[How-To] Glock 25 Cent Trigger Job
Easy step-by-step guide to polishing the correct trigger surfaces of the Glock 25 Cent Trigger Job with polishing compound and either hand or Dremel tools.

PPT Founder. NRA Pistol Instructor. USPSA/3-Gun/NRL22 Competitor. 250+ articles
We review products independently. When you buy through links on our site, we may earn a commission to help support our testing. Learn more.
Want to smooth out your Glock trigger in the comfort of your own home?
The Glock 25 cent trigger job uses polishing compound on a few internal surfaces to achieve a smoother trigger pull.
The purpose of this trigger job is just to polish the internals, not to remove any actual metal.
I've done this on two separate guns, one that had 500 rounds through it, and one that was around the 2000-round mark. I felt noticeable improvement in both guns, which is great considering how cheap and easy this method is.
So if 25 cents for a better trigger sounds like something that interests you, keep on reading!
Table of Contents
Why Do The 25 Cent Trigger Job?
When it comes to guns, the more you shoot them, the more the parts will naturally rub against each other. After enough rounds, all that rubbing will eventually polish those surfaces, resulting in a smoother feel.
But waiting for that to happen naturally can take a lot of rounds, which can be a lot of time and money.
You can speed this process up by using a polishing compound in conjunction with either hand-rubbing with a rag, Q-Tip, or Dremel tool to achieve the same or better results as just shooting the gun a ton.
While it isn't actually 25 cents, it is still very cheap and is the most cost-effective way to clean up your Glock Trigger.
Disclaimer: Incorrect application of the polishing compound can cause the gun to not function properly.
What You Need Before You Start
Must-Have Tools
- Fine polishing compound, such as Flitz or Car Polishing Compound.
- Q-Tips or a rag for hand polishing.
Nice to Have, But Not Needed
- Dremel Kit with the polishing attachment, if you want to speed things up even more.

Step-by-Step Instructions
Step 1: Fully Disassemble Your Glock
In order to access the parts required to complete the trigger job, you must first disassemble both the frame and slide of your Glock.
Below is an excellent video from Tactical Swede showing the full disassembly and reassembly of a standard Gen 3 Glock.
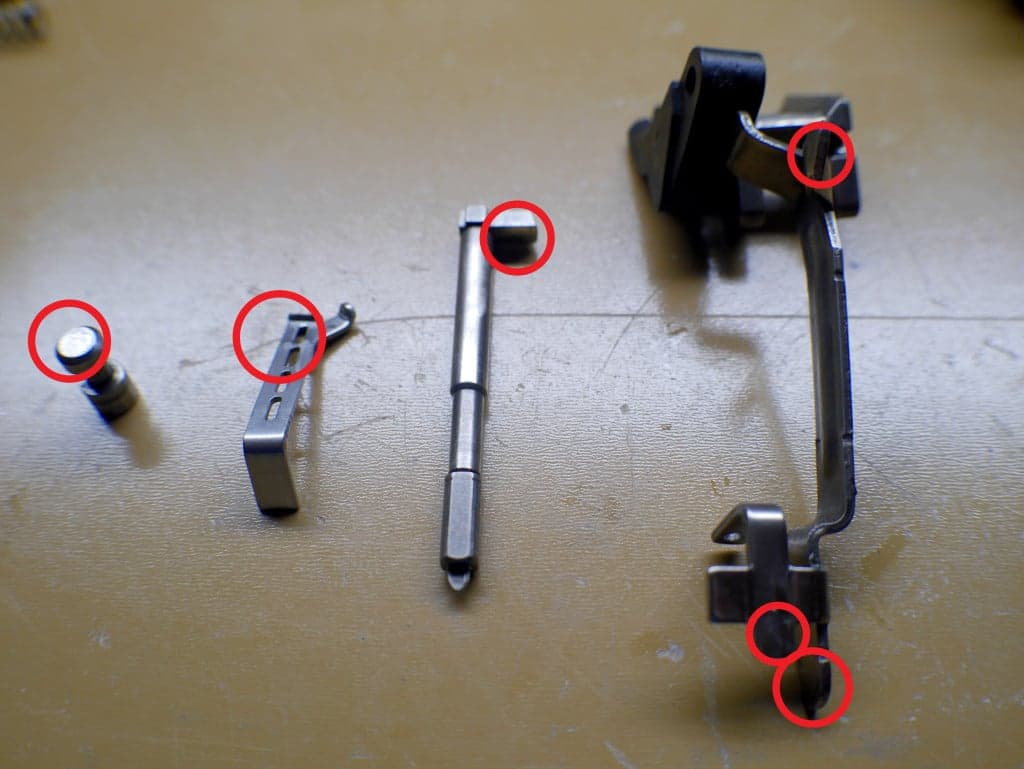
Step 2: Polish the Safety Plunger
You can polish them in any order, but we will go ahead and take a look at the safety plunger first.
For this step, you will want to polish the entire flat bottom of the safety plunger (circled in red).

To polish the part, you will first apply a light amount of Flitz or polishing compound to the area using either a Q-Tip or your finger.
Once the polish has been applied soft, clean rag and firmly rub the areas with the polish on them to buff the surfaces.

Repeat this step a few times until the surface has a shiny, almost mirror-smooth appearance and feel. A good test to make sure the surface is smooth is to run a Q-Tip across it and see if any fibers get stuck.
Note: If you are using a Dremel tool, make sure the polish/buffer wheel is attached and that you are at a relatively low-medium speed setting. While a Dremel can speed up the buffing process, they also bring a higher risk of removing too much material and causing issues. Less is more, and patience is key.

Step 3: Polish the Connector
The next part to polish is the connector. I am using a Ghost 3.5-pound connector here, but the process is the same for the OEM connector.
You will want to apply polish to the circled area, then use the same buffing process with the rag or Dremel as in the previous step.

You only need to polish the side where the lips are facing up, and only about halfway down the connector.
While you can polish the entire length of this connector, it is unnecessary, as the circled area is the only part that interfaces with another piece.
Step 4: Polish the Firing Pin
Next up is polishing the inside of the rear surface of the firing pin, using the same buffing process with the rag or Dremel as in the previous step.

You will want to take extra care not to round the corner/top edge of this piece. If that top edge becomes rounded, the firing pin will likely stop functioning correctly.
Step 5: Polish the Trigger Bar
This step is a little more involved, as it requires polishing three separate parts of the trigger bar.
The first area you want to polish is the upper part of the cruciform, or cross-shaped, area of the trigger bar.
If you want, you can polish the entire top of this cruciform area, although only the upper and side portions are necessary.

Next up is polishing the inside face of the trigger bar that is located underneath the cruciform area. This is the area that interfaces with the connector.

For the last area, you will want to locate the tab that sticks out near the front of the trigger bar. There is a raised lip on one side of this tab. You only need to polish the very top narrow edge of this tab.

For further reference, check out this excellent video that details the entire 25 Cent Trigger Job in high-def.
Step 6: Reassemble and Function Check
Once all of the parts have been polished, reassemble your Glock.
After the gun is reassembled, check the trigger for functionality by dry-firing the pistol when empty to ensure it works, and verify that the trigger resets properly.
Common Mistakes to Avoid
- Overpolishing – Using too much polishing compound and/or buffing the area too much or too hard can remove too much material. Use a light amount of compound and take it slow while applying light to medium pressure. If using a Dremel tool, work quickly at a low-to-medium RPM and use it with a light touch.
- Rounding off corners – Almost all of the surfaces that need to be polished are relatively flat. Avoid using too much pressure near the edges of the surfaces, as it can cause you to inadvertently roll the compound over the edges. Keeping the parts on a flat, stable surface while polishing helps.
- Incorrect Reassembly – Some parts on Glocks, such as the connector and trigger springs, require very specific angles and orientations to function correctly. If your trigger isn't working after reassembly, we highly recommend rewatching the disassembly/reassembly video to ensure everything is installed correctly.
FAQs
Q: How long does this take?
A: The whole job can be safely done in around an hour if you are familiar with the disassembly and reassembly process.
Q: Can I do this without a Dremel or rotary tool?
A: Absolutely. You can polish the parts by hand with a rag. If you are unfamiliar with operating a rotary tool, going by hand may be preferable to prevent over-polishing.
Q: What if my trigger isn't working after I am done?
A: Before you panic and start thinking you did too much polishing and removed too much material, first disassemble and reassemble the gun again. Sometimes the issue could be as simple as the connector bar or other part not being reinstalled correctly. If the issue persists, you can then move on to replacing parts.
Q: Can I do this on a Gen 6 Glock?
A: Yes. Although some of the parts are shaped differently, you can still polish the areas where they interface to achieve similar results.
Final Thoughts & Next Steps
Following these steps and taking everything slow and easy should result in a smoother trigger pull on Glocks with lower round counts.
So now that you know how to do the 25 Cent Glock Trigger Job, it is time to grab some polish and smooth everything out!

Don't want to fiddle with polishing it yourself? Then check out some aftermarket options in our hands-on article covering the Best Glock Triggers!
Latest Updates
March 2026: Included additional videos and various media.