JUMP TO SECTION
Jump To:

Trigger Job Essentials
Reference Materials
This is a quick overview of a 1911 trigger job. We’ve done our research through the gold standard in manuals and videos. We thoroughly suggest picking them up if you want to learn more about the 1911.Trigger Job Tools
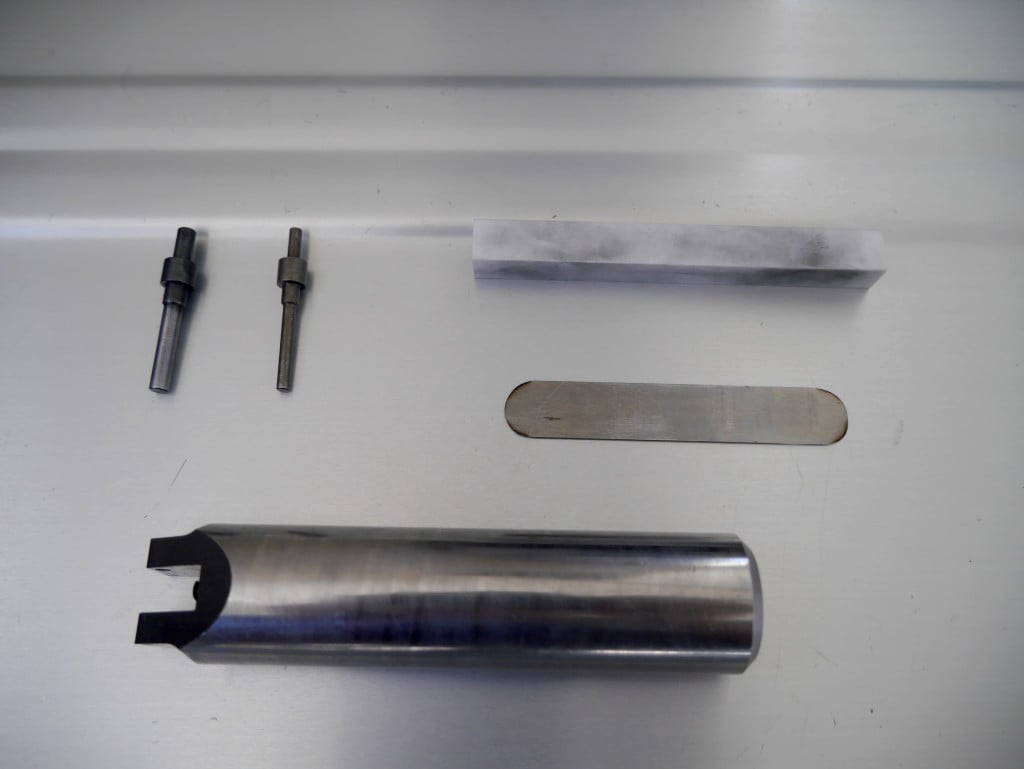
- Ed Brown Sear Jig ($50): Big hunk of metal and the small shim that lets you grind at the correct angle
- Square Arkansas Stone ($15): Not shown, medium stone
- Square Ceramic Stone ($25): Fine stone for polishing of surfaces
- Trigger Adjustment Pins ($30): Let’s you see the final placement without getting the armorer’s block
- Trigger Weight Scale ($25): So you can measure your success
- 3M 1000 Grit Sandpaper ($10): Fine sandpaper for fitting in trigger adjustment pins or polishing other 1911 parts. Good to have around.
Trigger Job Parts
- Light Sear Spring($8): Get at least two since you might mess the first one up.
- Light Mainspring ($4): The factory weight for .45 ACP 1911’s is 23 lb but you can go down to 20 for normal loads and even 18 for light loads. For 9mm, I’ve gone down to 17 lb for normal loads and 15 lbs for light competition loads.
The 1911 Trigger Job
Here’s a screen capture from the YouTube video we’ll watch later. It gives a good idea of how the trigger, sear and hammer interact. We want our sear and hammer to look like the bottom right.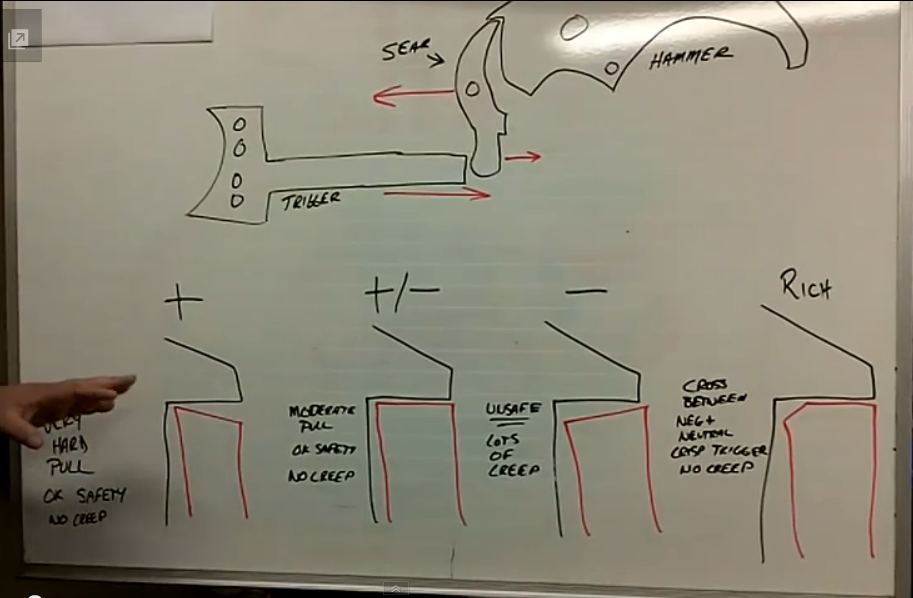
Primary Sear Angle
Load up the sear into the jig, put some oil on the bottom of the shim, and start honing the sear with the medium Arkansas stone until the matches up with the shim which is .02 inches high. Then run the fine ceramic stone over to make it shiny.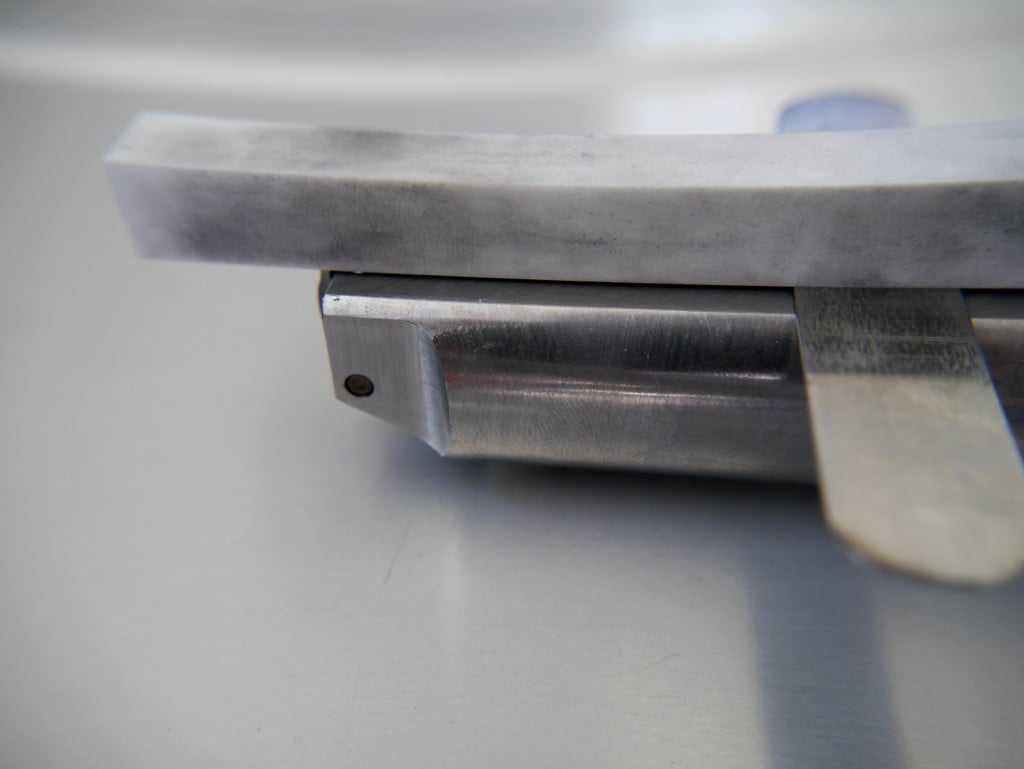
Secondary Sear Angle
This is the 45 degree break in the sear to eliminate the creep in the trigger. The video will suggest going by hand, but I had good results using the shim as a guide.
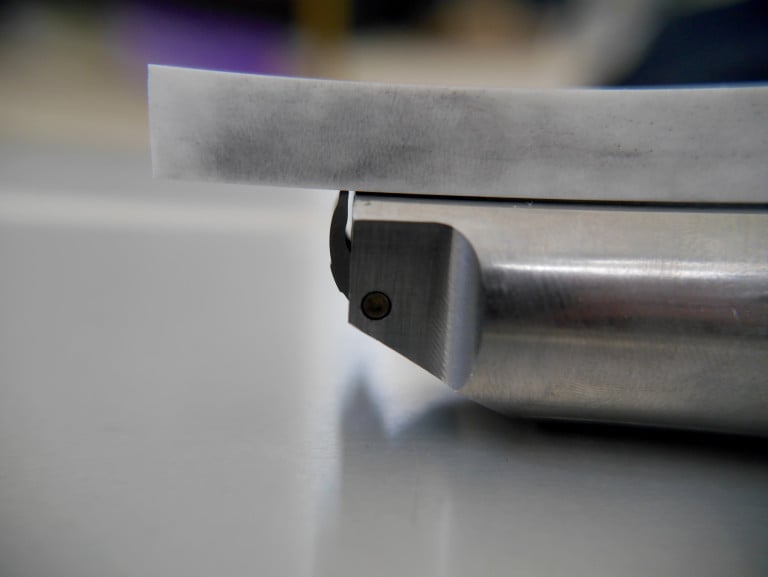
Hammer Hook Angle
You want these at a 90 degree angle. The best way is to use the straight edge of your stones. Do a couple swipes on the Arkansas stone and finish it off on the ceramic.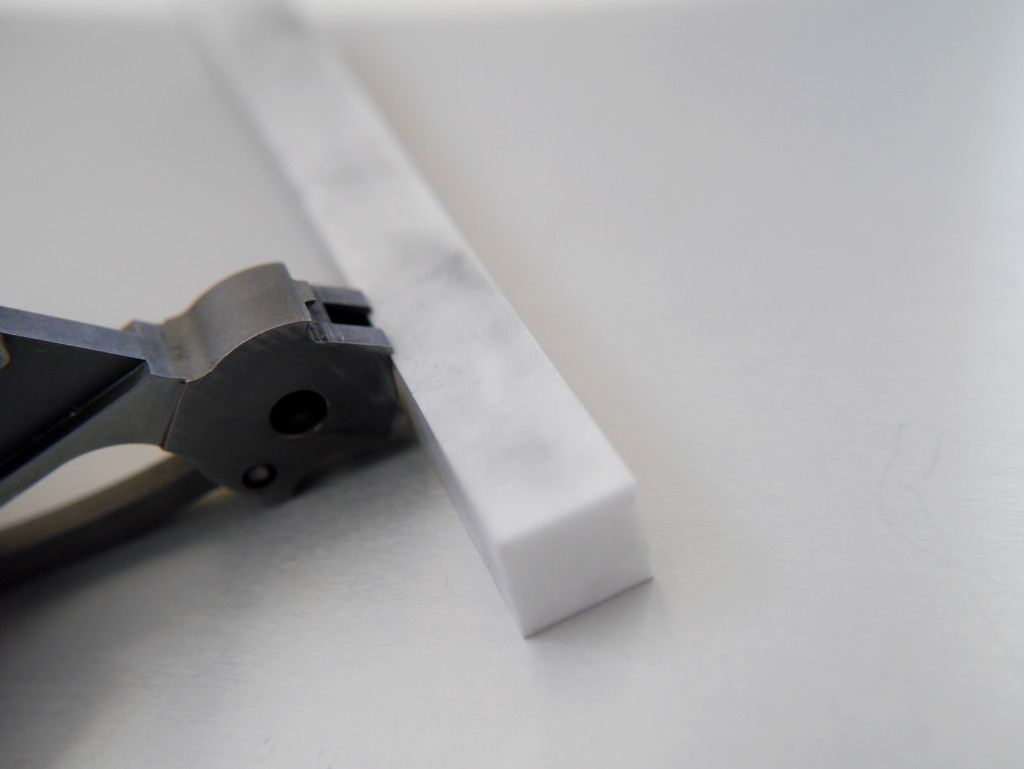
Check Your Progress
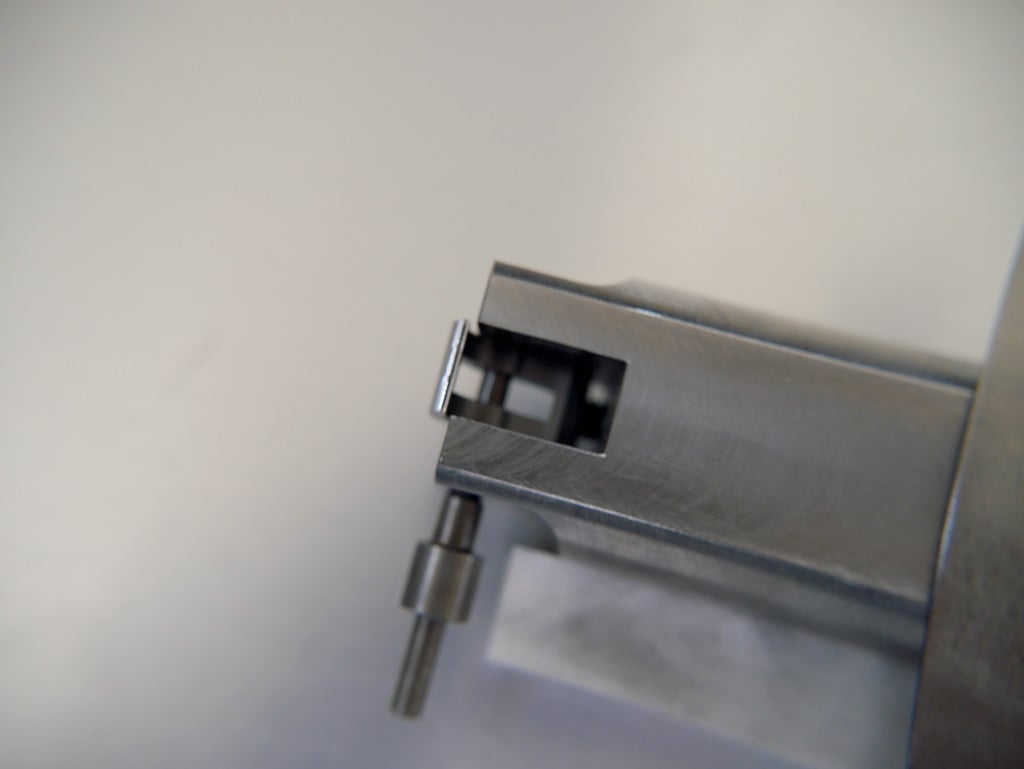
Here is where the trigger adjustment pins come in. I had to use some sandpaper to file down the pins’ diameter to fit my gun. You can actually see the angles instead of putting everything together and trying to “feel” the difference. Although when done correctly, you’ll definitely feel a crisper trigger. Looks good!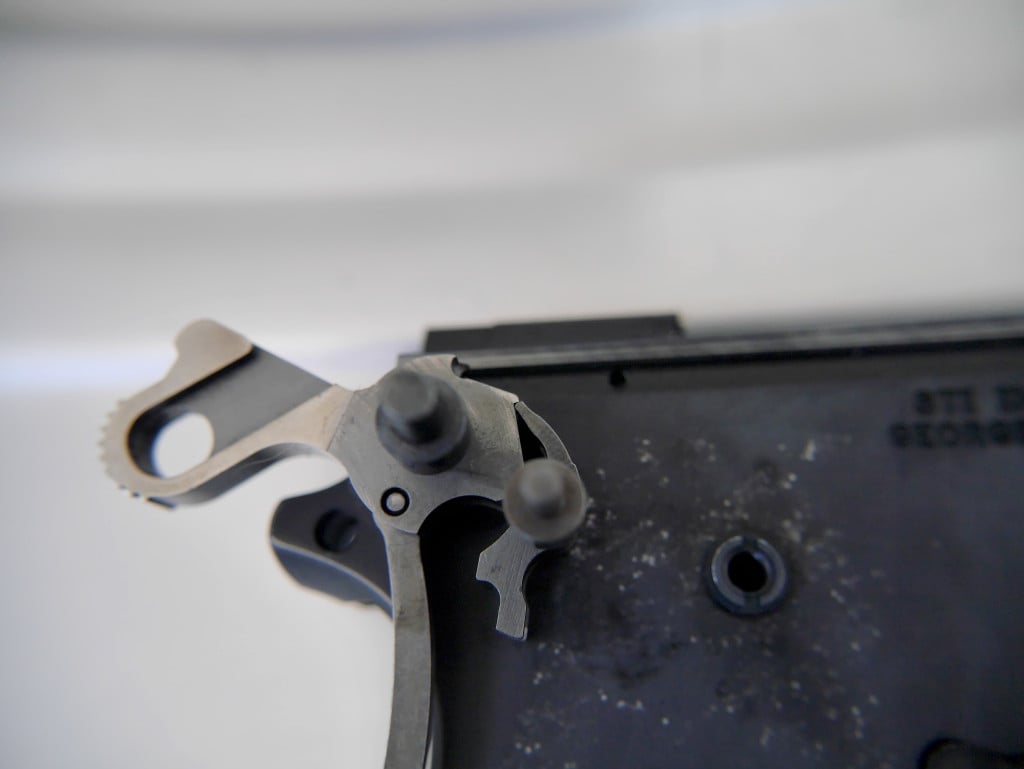

Video
This video goes over everything we talked about and a little more on polishing and tuning the sear spring. We’ll go over tuning the sear spring further down in the article after conducting function checks of what we’ve done so far.Function Check
One of the most important parts. Always function check your gun after any modifications. It’s possible that you took too much off something, or tuned the sear spring too much. Easier to replace some parts than have your 1911 have an accidental discharge or go full-auto at the range.Sear Spring Tuning and Lower Mainspring
If everything functions properly, you can start to lower the trigger pull weight by bending your sear spring to lower the trigger pull. This is done by bending the middle leaf back. Make sure to grasp the bottom of the spring while you bend it. Just a little will have an effect. Put everything together and conduct another full set of function checks before you try out the trigger pull scale. At the same time I also swapped out my mainspring to a lighter one. If you have a .45 ACP 1911, you can normally go down to 20 lbs or even 18 for light loads. For my 9mm I went down to 17 lb for regular loads and 15 lbs for competition loads. If you start getting light primer strikes, you might need to go back up a few pounds. It makes a decent difference, but like GTT in the video, I don’t think the difference is 25%. I ended up with a hammer follow problem so I threw my light sear spring away and started again. Below is my final result (there’s not too much visible difference). The right is my modified light one that has been safe and reliable for over 1500 rounds and clocks in at a sweet 3.5 lbs!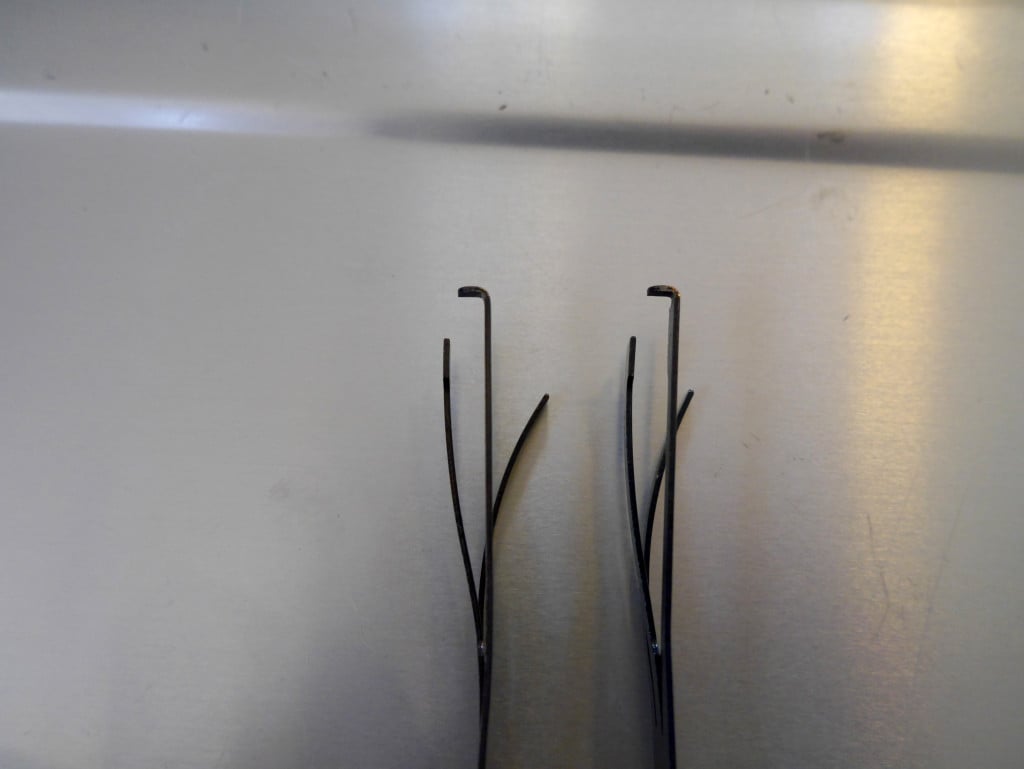


13 Leave a Reply
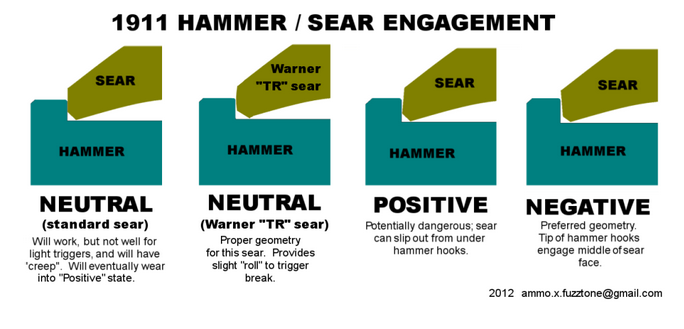
What is shown on pic „Sear hammer close up” shows how NOT to do a trigger job… Even on first drawing you show that it’s unsafe angle. It is indeed „smooth” option as there’s minimal contact but this it is simply dangerous and that’s not how you angle the sear vs hammer. Please review that and update because someone can follow this tutorial, do as you show on „real photo” and come into real trubles.
My English is not very well .I’ve already tunning my hammer and sear , but if I loading using too much intensity, the hammer will down
There is negative angle on the firest drawing described as unsafe and positive one on the second one noted as dangerous... anyone confused too...?
"20 one hundredths an inch" (says the video). You do know that's almost a 1/4" right? The shim sure isn't anywhere near 1/4" thick; it's 20 one thousandths of an inch thick. There seems to be no end to the misguiding information to be found on the internet regarding this subject. Good thing I am not going to rely on just one or two sources for this information. I would advise others to do the same. Or use a gunsmith.
Eric, I'm under the impression that a NEGATIVE sear to hammer engagement is dangerous. When you have negative engagement, the theory is that a direct blow onto the hammer may cause the sear to slip out, causing a negligent discharge.
Positive engagement is the most safe (but also the hardest to pull) because a blow to the hammer will increase the engagement of the 2 parts, and thus avoiding a ND.
Neutral engagement is best because it will resist hammer fall on a direct blow, but also permit a light trigger pull.
THE PHOTO OF THE "EXTERNAL ALIGNMENT PINS" ON THE RIGHT SIDE OF THE FRAME, SHOW THE HAMMER & SEAR "PINNED" AGAINST THE SIDE OF THE FRAME. THAT IS INCORRECT !!!!! THE PARTS ARE DESIGNED TO MOUNT ON THE UPPER TIP OF THE PINS. THAT WAY, THE HAMMER & SEAR ARE POSITIONED "UP" AND MAKING ZERO CONTACT WITH THE FRAME. THIS ENABLES THE PISTOLSMITH TO VIEW BOTH SIDES OF THE PARTS @ THE SAME TIME & PERMITS VISUAL INSPECTION OF THE MATING OF THE SEAR NOSE, WITH THE FACE OF THE HAMMER HOOKS FROM BOTH ENDS OF THE SEAR NOSE !!!! SOME OF US INSPECT THE PARTS ON BOTH SIDES OF THE FRAME, AS THE PINS FIT BI-LATERALLY !!!!!!!!------OOORAH & SEMPER FIDELIS !!!!!!!!
if your gun is new or you have a high quality sear, such as C&S you will never have to touch the sear, and i mean not even stone
it. just square your hammer hooks and use a Nowlin sear spring and a 19lb hammer spring. and bingo a instant 3.5 lb trigger
Hi Mike, thanks for the insight, hopefully it helps out some of my readers who are wondering if their sear needs anything.
Thanks for this! Another thing I have found helpful is to use a trigger track stone from Brownells. Then polish the trigger bow to a mirror finish. I also found sliding the magazines you use though the trigger bow and tweaking any spots that rub. Then slide the trigger bow into the track and make sure it still falls out when the gun is pointed up (no resistance). I appreciate this info!
Thanks for the tip, I'll have to check it out rather than just trying to jam in some sandpaper!
Explain to me why the screenshot of the video, that you say your going to follow, has a completely different sear/ hammer engagement than your finished project. What is the proper engagement, the video where he explains the "rich" trigger or the pic of your finished product?
Great question, I researched some more and updated the article with a more precise drawing and a closeup of my final engagement. Reminder: I'm not a gunsmith!
Man! You just helped me solve My gritty trigger issue. I compared my drop in Wilson triggers on my Springfield to my factory kimber triggers and noticed they were polished and done just like you taught. Thanks a million for this video.
Now, that being said. Do you have anything for AR triggers that have that slight creep?